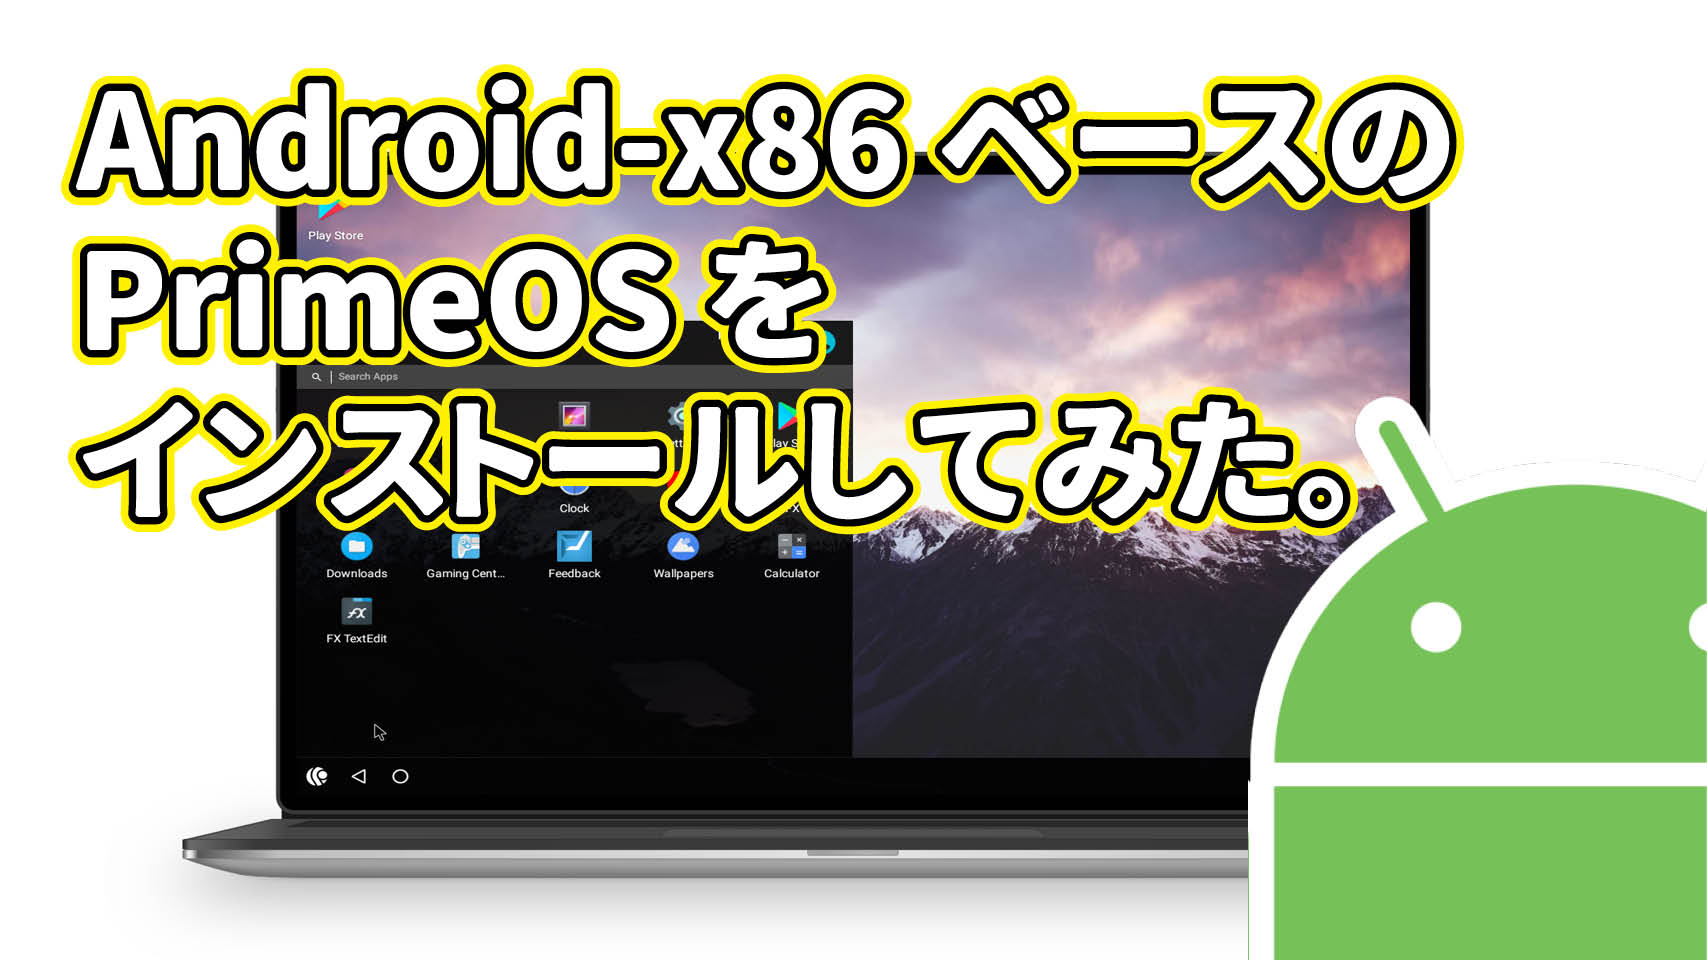
PC にインストールした Android-x86 ベースの PrimeOS を、日本語の環境に合うように設定してみる。
前回までのおさらいはコチラから。
▶パソコンで Android !? Android-x86 ベースの PrimeOS とは?
▶Android-x86 ベースの PrimeOS をインストールしてみた。
初期設定
まずは初期設定として、ユーザー名や誕生日、性別、タイムゾーンといった情報を入力する。
” * (アスタリスク)” がついた項目は必須(すべての項目についているが)なので、必ず設定する。
![](https://i0.wp.com/pc-freedom.net/wp-content/uploads/2019/05/Screenshot_20190519-100953.png?fit=1024%2C640&ssl=1)
![](https://i2.wp.com/pc-freedom.net/wp-content/uploads/2019/05/Screenshot_20190519-101016.png?fit=1024%2C640&ssl=1)
“2019” (年にあたる箇所)をクリックすると、西暦の一覧が表示される。
![](https://i2.wp.com/pc-freedom.net/wp-content/uploads/2019/05/Screenshot_20190519-101010.png?fit=1024%2C640&ssl=1)
![](https://i2.wp.com/pc-freedom.net/wp-content/uploads/2019/05/Screenshot_20190519-101057.png?fit=1024%2C640&ssl=1)
![](https://i0.wp.com/pc-freedom.net/wp-content/uploads/2019/05/Screenshot_20190519-191114.png?fit=1024%2C640&ssl=1)
都市の設定は、わりと細かい都市まで選ぶことができる。
![](https://i2.wp.com/pc-freedom.net/wp-content/uploads/2019/05/Screenshot_20190519-191132.png?fit=1024%2C640&ssl=1)
問題がなければ “Accept” をクリックして進める。
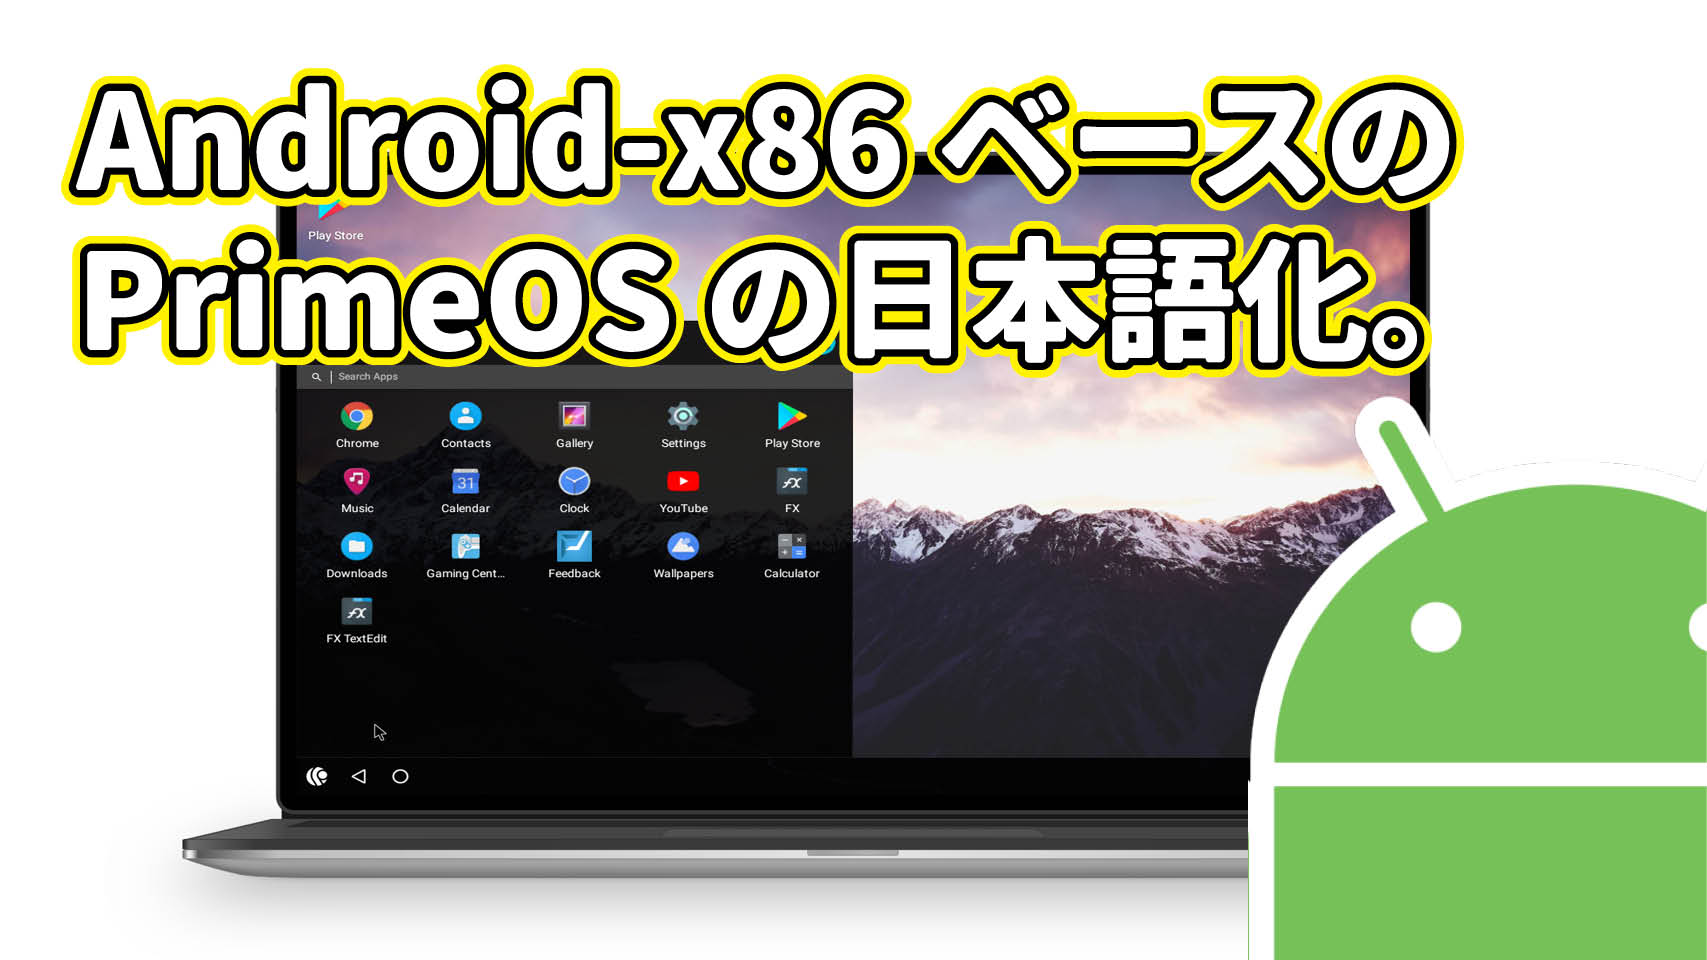
![](https://i0.wp.com/pc-freedom.net/wp-content/uploads/2019/05/Screenshot_20190519-191138.png?fit=1024%2C640&ssl=1)
![](https://i1.wp.com/pc-freedom.net/wp-content/uploads/2019/05/Screenshot_20190519-191141.png?fit=1024%2C640&ssl=1)
![](https://i0.wp.com/pc-freedom.net/wp-content/uploads/2019/05/Screenshot_20190519-191143.png?fit=1024%2C640&ssl=1)
![](https://i1.wp.com/pc-freedom.net/wp-content/uploads/2019/05/Screenshot_20190519-191146.png?fit=1024%2C640&ssl=1)
PrimeOS の日本語化
ここからいよいよ日本語化の設定を進めていく。
日本語の表示設定
![](https://i0.wp.com/pc-freedom.net/wp-content/uploads/2019/05/Screenshot_20190519-191151.png?fit=1024%2C640&ssl=1)
![](https://i0.wp.com/pc-freedom.net/wp-content/uploads/2019/05/Screenshot_20190519-191527-1.png?fit=1024%2C640&ssl=1)
設定画面は、スマホで見たことのあるような画面。
![](https://i1.wp.com/pc-freedom.net/wp-content/uploads/2019/05/Screenshot_20190519-191434.png?fit=1024%2C640&ssl=1)
![](https://i1.wp.com/pc-freedom.net/wp-content/uploads/2019/05/Screenshot_20190519-191442.png?fit=1024%2C640&ssl=1)
![](https://i0.wp.com/pc-freedom.net/wp-content/uploads/2019/05/Screenshot_20190519-191455.png?fit=1024%2C640&ssl=1)
まずはこれで、日本語表示されるようになった。
日本語入力設定
日本語入力の設定をするためには、いくつかアプリケーションをインストールしなければ行けないので、Google アカウントにログインする必要がある。
ログイン
ログインは、左上にある “Play ストア” をクリックすると、ログイン画面が表示される。
![](https://i1.wp.com/pc-freedom.net/wp-content/uploads/2019/05/Screenshot_20190519-191555.png?fit=1024%2C640&ssl=1)
![](https://i1.wp.com/pc-freedom.net/wp-content/uploads/2019/05/Screenshot_20190519-191608.png?fit=1024%2C640&ssl=1)
![](https://i0.wp.com/pc-freedom.net/wp-content/uploads/2019/05/Screenshot_20190519-191655.png?fit=1024%2C640&ssl=1)
![](https://i2.wp.com/pc-freedom.net/wp-content/uploads/2019/05/Screenshot_20190519-191701.png?fit=1024%2C640&ssl=1)
僕の場合、思ったよりも長かったので不安になった。
トイレに行ったり休憩して待つことをおすすめする。
![](https://i0.wp.com/pc-freedom.net/wp-content/uploads/2019/05/Screenshot_20190519-191910.png?fit=1024%2C640&ssl=1)
引き続き、必要なアプリのダウンロードを行う。
アプリのダウンロード
Android で日本語入力を行うには「Google 日本語入力」が必要になる。
Play ストアにアクセスして Google 日本語入力をインストールする。
![](https://i1.wp.com/pc-freedom.net/wp-content/uploads/2019/05/Screenshot_20190519-191921.png?fit=1024%2C640&ssl=1)
まだ日本語入力環境が整っていないので「nihongo」と入力する。
それでも候補にはちゃんと必要なアプリ「Google 日本語入力」が表示される。
![](https://i1.wp.com/pc-freedom.net/wp-content/uploads/2019/05/Screenshot_20190519-192231.png?fit=1024%2C640&ssl=1)
![](https://i0.wp.com/pc-freedom.net/wp-content/uploads/2019/05/Screenshot_20190519-192236.png?fit=1024%2C640&ssl=1)
![](https://i1.wp.com/pc-freedom.net/wp-content/uploads/2019/05/Screenshot_20190519-192302.png?fit=1024%2C640&ssl=1)
すぐに設定を行うので「開く」をクリックし、設定を進める。
![](https://i0.wp.com/pc-freedom.net/wp-content/uploads/2019/05/Screenshot_20190519-192308.png?fit=1024%2C640&ssl=1)
![](https://i1.wp.com/pc-freedom.net/wp-content/uploads/2019/05/Screenshot_20190519-192316.png?fit=1024%2C640&ssl=1)
![](https://i0.wp.com/pc-freedom.net/wp-content/uploads/2019/05/Screenshot_20190519-192320.png?fit=1024%2C640&ssl=1)
複雑な思いを抱えつつも「OK」をクリックし、設定を進める。
![](https://i0.wp.com/pc-freedom.net/wp-content/uploads/2019/05/Screenshot_20190519-192325.png?fit=1024%2C640&ssl=1)
![](https://i0.wp.com/pc-freedom.net/wp-content/uploads/2019/05/Screenshot_20190519-192330.png?fit=1024%2C640&ssl=1)
![](https://i0.wp.com/pc-freedom.net/wp-content/uploads/2019/05/Screenshot_20190519-192334.png?fit=1024%2C640&ssl=1)
![](https://i2.wp.com/pc-freedom.net/wp-content/uploads/2019/05/Screenshot_20190519-192338.png?fit=1024%2C640&ssl=1)
![](https://i0.wp.com/pc-freedom.net/wp-content/uploads/2019/05/Screenshot_20190519-192518.png?fit=1024%2C640&ssl=1)
![](https://i1.wp.com/pc-freedom.net/wp-content/uploads/2019/05/Screenshot_20190519-192450.png?fit=1024%2C640&ssl=1)
これでアプリのインストールと、日本語入力の設定は完了。
引き続き、キーボードのレイアウトを変更する。
キーボードレイアウト
日本語表示で名前の変わった「言語と入力 (Languages & input)」で、キーボードレイアウトを変更する。
![](https://i2.wp.com/pc-freedom.net/wp-content/uploads/2019/05/Screenshot_20190519-192639.png?fit=1024%2C640&ssl=1)
![](https://i0.wp.com/pc-freedom.net/wp-content/uploads/2019/05/Screenshot_20190519-192646.png?fit=1024%2C640&ssl=1)
![](https://i0.wp.com/pc-freedom.net/wp-content/uploads/2019/05/Screenshot_20190519-192658.png?fit=1024%2C640&ssl=1)
一覧の中ほどに「日本語」がある。
ほかの環境の場合どうなのかわからないけれども、僕の環境では「日本語 109A」のみだった。
![](https://i2.wp.com/pc-freedom.net/wp-content/uploads/2019/05/Screenshot_20190519-192727.png?fit=1024%2C640&ssl=1)
以上で日本語入力ができるようになった。
ちなみに、タブレット端末などで使える「仮想キーボード」についても設定ができる。
![](https://i1.wp.com/pc-freedom.net/wp-content/uploads/2019/05/Screenshot_20190519-192759.png?fit=1024%2C640&ssl=1)
英語キーボードと日本語キーボードの切り替えは [ Alt ] + [半角/全角] で切り替えられる。
ちなみに英語キーボードの場合は [ Alt ] + [ ` (バッククォート、またはグラーブアクセント) ] で切り替えられる。
![](https://i1.wp.com/pc-freedom.net/wp-content/uploads/2019/05/Screenshot_20190519-192843.png?fit=1024%2C640&ssl=1)
画面右下のアイコンも “En” になっている。
![](https://i0.wp.com/pc-freedom.net/wp-content/uploads/2019/05/Screenshot_20190519-192845.png?fit=1024%2C640&ssl=1)
画面右下のアイコンは “あ” になっているので、今のキーボードの設定がどちらなのか確認できる。
個人的な意見ですが、
Android-x86 を久しぶりに覗いてみると、面白いことになっていた。
スマホゲームも、ハイスペックを要するものが多くなってきているので、PC のパワーを使って楽しもうと思うのは必然かもしれない。
ただし Android は、基本的にモバイル端末ようのオペレーティングシステムだし、操作とかもそれ用になっているので、PC とかで使うにはそれなりに環境を整えなければいけない。
Android-x86 の場合は、ほぼそのままの Android なので、場合によっては不具合を感じることもある。
例えば PC なら当たり前のマルチウィンドウなんか、モバイル端末内だと難しいというか、多分必要性がないのであろう。
でも PC だと、マルチウィンドウが使えないとなると、かなりのストレスになる。
これを解消していたのが Remix OS だったと僕は思っていた。
しかしながら、ビジネスとして成立しなかったのだろう。
残念ながら Remix OS の開発は終わってしまった。
他の Linux よりも軽量で、なおかつモバイル向けとはいえ豊富なアプリがある Android は、PC ユーザーからみても魅力的に映る。
PrimeOS が長く続くことを心から望む。
てか、まだゲームをプレイしていないので、機会があればそちらの方のレビューもしてみたい。
PrimeOS に興味を持ったアナタは、今すぐダウンロード!